
Sunglasses Product Photography: Killing Reflections, Showing Fit
August 8, 2026 · 8 min read · by Aashirvad Kumar
Your credits refresh every month for as long as ListingRVA AI exists. No renewals, no annual increases, nothing to cancel.
Available on select plans. No renewals, ever.
August 8, 2026 · 8 min read · by Aashirvad Kumar
Zoom into your best sunglasses shot and you will find yourself in it. A softbox as a bright white rectangle across the left lens, a window frame in the right one, and somewhere in the curve, a small distorted photographer holding a phone. Sunglasses product photography has this problem more severely than any other category because a curved lens is not a flat mirror, it is a convex one, and a convex mirror compresses an entire room into a few hundred pixels.
The second problem is quieter and costs more. A pair of frames lying on a white surface tells a buyer nothing about whether it will fit their face. Eyewear returns cluster around exactly that: the frame arrived and it was too wide, too narrow, or the lenses sat too high. Both problems are solvable, and neither is solved by better equipment.
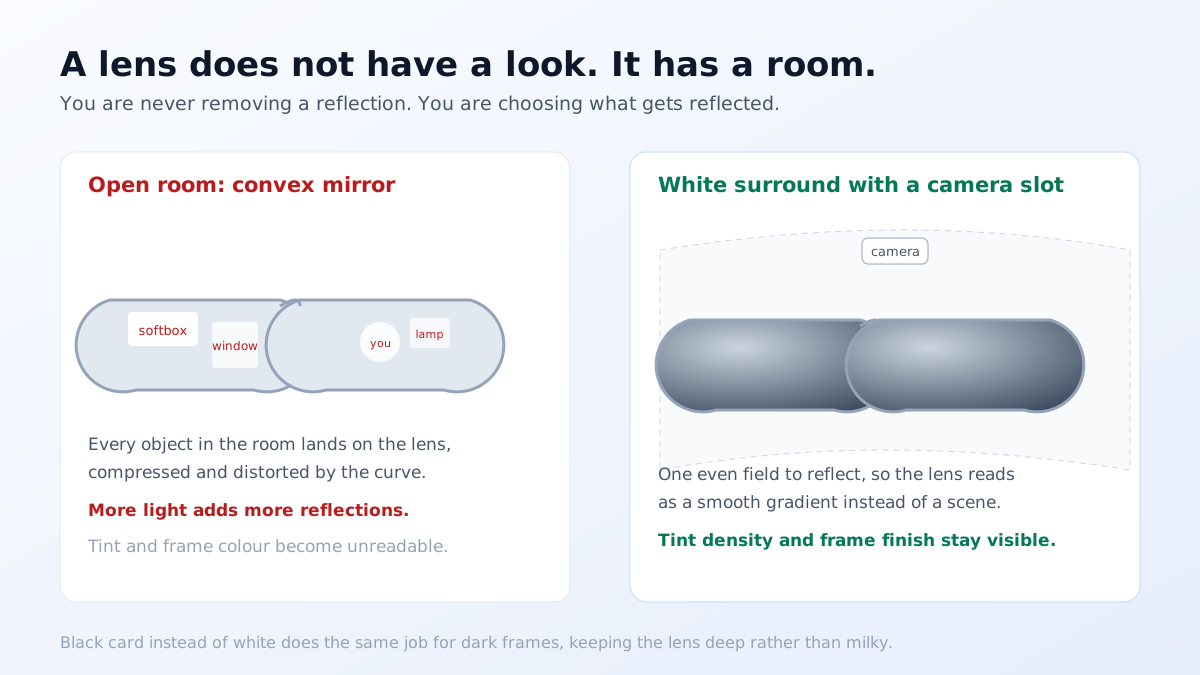
A lens has no appearance of its own. Everything you see in it is something else in the room, which means there is no such thing as removing a reflection. There is only deciding what gets reflected. Once you accept that, the work stops being a fight and becomes an arrangement problem, and the arrangement is usually simpler than whatever you were doing before.
The practical method is to fill the lens with one large clean surface. A sheet of white card curved around the front of the frames, with a slot cut for the camera, gives every point on the lens the same thing to reflect. The result is a lens that reads as a lens, with an even gradient and no recognisable objects in it. For dark or matte-effect frames a black card surround does the same job in reverse and keeps the lens looking deep rather than milky.
The reflection you see is governed by geometry: for any point on the lens, the camera sees whatever sits at the mirrored angle. That means adding more lights adds more reflections, and the fix for a hotspot is almost always to move the camera or the light a few degrees rather than to change the lighting power. Shift the light further off to the side and the highlight slides off the lens face and onto the bevel where it actually helps describe the shape.
This is the same geometry that governs every glossy product, and if you are shooting jewellery, watches or lacquered goods you have met it before. It is worth learning once because it applies everywhere, and the broader version of it is set out in the notes on product photo lighting mistakes that recur across categories.
Reflections from non-metallic surfaces such as plain glass or plastic are partially polarised, so a circular polarising filter on the lens can cut them substantially when the angle is right. On plain tinted frames this is the single cheapest improvement available. On mirrored and flash-coated lenses the effect is much weaker, because a metallic coating reflects without polarising, so those frames have to be solved geometrically with surrounds and camera placement.
Worth knowing before you buy a filter: rotating a polariser also darkens the lens tint in the photograph, sometimes noticeably. If you use one, shoot a second frame without it so you have an accurate record of the true tint density, and use that frame for the colour reference image in your listing.
Tint is systematically misjudged from listing photos, because a lens photographed against pure white looks lighter than it is and the same lens against a dark background looks almost opaque. Two frames fix it. One with a neutral mid-grey card directly behind the lens, so the viewer is comparing the tint against a known value. One with the lens held over printed text, which shows the density in the only way anyone intuitively understands.
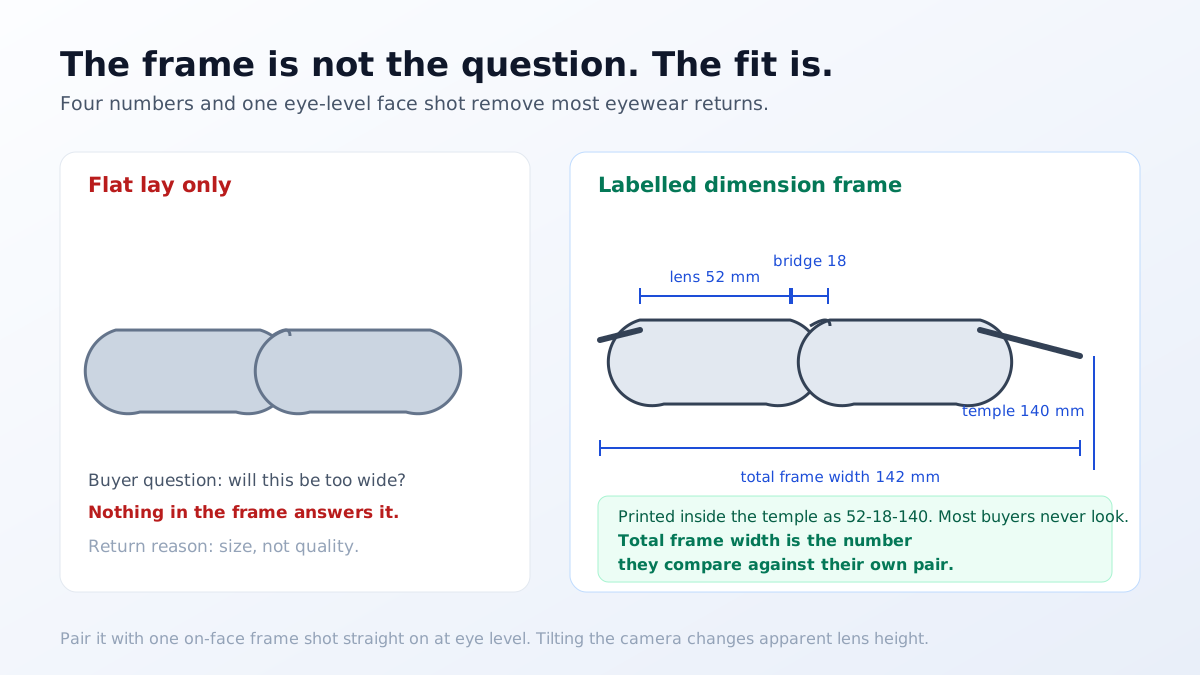
Every optical frame carries three numbers, usually printed inside one temple arm: lens width, bridge width and temple length in millimetres, written in the familiar form 52-18-140. Experienced eyewear buyers read those numbers off the pair they already own and match. Everyone else does not know they exist. Serve both audiences by photographing the printed marking where it is legible, and by adding a labelled dimension frame that includes the number neither group can find anywhere else: total frame width across the front.
Then give the visual comparison, because a number does not answer the real question. At least one on-face frame is close to mandatory in sunglasses product photography, shot straight on at eye level, because a camera even slightly above or below changes apparent lens height enough to mislead. Showing the same frame on a narrow face and a wider face does more for conversion than another studio angle, since the hesitation being removed is specifically about proportion.
Cleaning up the background after a shoot on grey used to be the tedious part of this workflow, particularly around rimless frames and hinge gaps where a hard cutout looks obviously fake and a soft one leaves a grey halo. It is also the step most likely to be rushed at the end of a long session, which is how listings end up with one frame on pure white and the next on something slightly warmer. That step is now seconds rather than minutes with the free background remover tool, which changes the calculus on shooting grey in the first place.
Once you have a clean, sharp, correctly exposed front frame and a three-quarter frame, almost everything else in an eyewear image set is context rather than new information about the object. Beach light, a café table, a car dashboard, a seasonal palette: these are scenes, and scenes are cheap to produce now. That is the split where AI product photography earns its place in this category, because the object is the hard part and the object only has to be photographed once.
What still deserves a real camera is anything where the lens surface itself is the subject, and anything on a face. Reflection behaviour and the way a frame sits against a temple and a cheekbone are exactly the details where generated images tend to drift, and eyewear buyers are unusually good at spotting the drift because they have spent years looking at their own glasses. The pattern that works is a small real shoot for the object and the face, generation for everything around it. The same division applies in other fit-critical categories, and the footwear product photography guide reaches the same conclusion from a different direction.
Whatever you produce, check it survives the platform. Marketplace rules on frame fill, background purity and minimum pixel dimensions bite harder on small products photographed against white, and the thresholds are laid out in the Amazon image requirements guide. Eyewear is small in the frame by nature, so a shot that fills only half the canvas leaves the product occupying a few hundred pixels once the platform generates its thumbnail, and no amount of reflection control rescues an image that is effectively too small to read. Crop tight, export large, and let each marketplace shrink from a generous master rather than from something already at the limit. Consistent framing across a range also matters more in sunglasses product photography than in most categories, because buyers compare frames side by side in a grid and any variation in scale reads as a difference in the products rather than in the photographs.
You cannot remove them, because a lens has no appearance of its own and what you see in it is your room. Control what it mirrors instead. Surround the frame with large white or black card so the lens reflects a single even field, keep the camera and yourself outside the reflection zone, and move the light rather than adding more of it.
On plain glass or plastic lenses it helps a great deal, because reflections from non-metallic surfaces are partly polarised and a circular polariser can cut them at the right angle. On mirrored or flash-coated lenses it does much less, since the coating is metallic and reflects light without polarising it. Those frames have to be solved with surrounds and camera position.
Shoot one frame with a neutral mid-grey card visible directly behind the lens so the viewer sees the tint against a known reference, and a second frame of the lens over printed text or a simple pattern so the density of the tint is readable. Tint judged against a white background always looks lighter than it is, which is a common source of returns.
The three numbers usually printed inside the temple arm: lens width, bridge width and temple length in millimetres, plus total frame width across the front. Photograph the printed marking itself where it exists, and add a labelled dimension frame. Total frame width is the number most buyers actually use to compare against a pair they already own.
At least one, because face fit is the main hesitation and a frame lying flat gives no proportion reference. The frame should be shot straight on at eye level, since a slight upward or downward camera angle changes apparent lens height noticeably. More than one face shape helps buyers with narrower or wider faces judge whether the frame will sit correctly.
Because exposing for a bright white background pushes a dark glossy frame into a shape with no internal detail, and the acetate layering, the hinge and the temple bevel all vanish. Add a rim light or a bright card just outside the frame edge so a thin highlight traces the outline, or shoot on a very light grey rather than pure white and clean it afterwards.
ListingRVA AI now works inside Claude. Connect your workspace and ask Claude to generate listing copy and publish product images to your store, without leaving your editor. See the Claude connector →
Comments
No comments yet, be the first.
Leave a comment