
Product Photo Lighting Mistakes That Make Everything Look Grey
July 25, 2026 · 8 min read · by Aashirvad Kumar
Your credits refresh every month for as long as ListingRVA AI exists. No renewals, no annual increases, nothing to cancel.
Available on select plans. No renewals, ever.
July 25, 2026 · 8 min read · by Aashirvad Kumar
You set the product on a white sheet, you shoot in a bright room, and the photo comes back with a background that is unmistakably grey. Not white with a slight tint, actually grey. So you buy a brighter lamp, and it is still grey. You buy a whiter backdrop, and it is still grey. Nothing you change fixes it, because the problem is not the light or the backdrop.
Product photo lighting has a handful of failure modes that account for nearly every bad ecommerce image, and most of them are counterintuitive enough that buying better equipment makes them worse rather than better. This is what each one is, why it happens, and the specific correction.
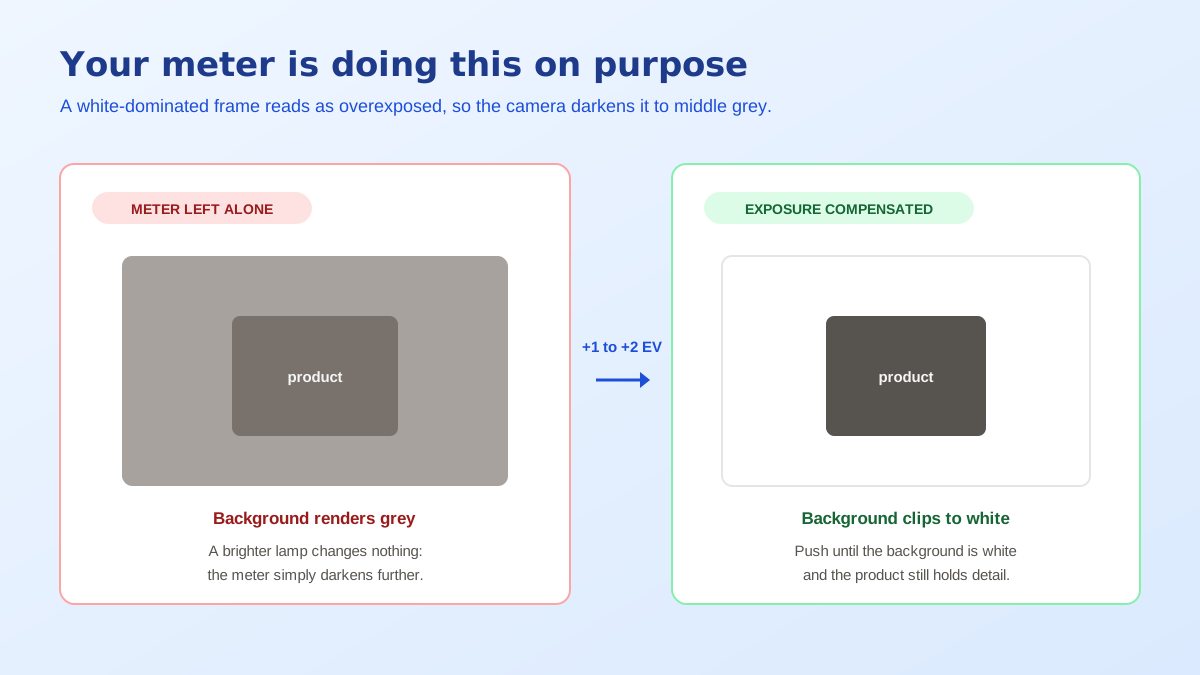
Your camera's light meter was built on an assumption: that an average scene reflects roughly 18 percent of the light falling on it. That assumption holds for a street, a room, a person. It collapses completely when the frame is dominated by a white backdrop, because the meter sees an unusually bright scene, concludes it is overexposed, and darkens everything until the average lands back at middle grey. Your white sheet is what gets sacrificed.
This is why the brighter lamp does not help. Add more light and the meter simply darkens further to compensate, holding the result at exactly the same grey. The correction is to override the meter with exposure compensation, typically plus one to plus two stops, which tells the camera to ignore its own conclusion. On a phone, tap the product to focus and then drag the brightness slider up until the background clips to white. It will look wrong on the screen for about a second and then look correct.
Daylight from a window is around 5500K. A warm household bulb is around 2700K. An older fluorescent tube is somewhere else again, often with gaps in its spectrum that no white balance setting can correct. When two of these land on the same product, your camera can only neutralise one of them, so the other shows up as a cast, and because the two sources come from different directions the cast shifts across the object. One side of a navy jumper goes purple, the other goes green.
This is the most expensive product photo lighting mistake in ecommerce, because it does not look like a mistake. It looks like the product's actual colour, right up until the buyer opens the box and disagrees. The fix costs nothing: switch off every light in the room except one type. One window, or one lamp, never both.
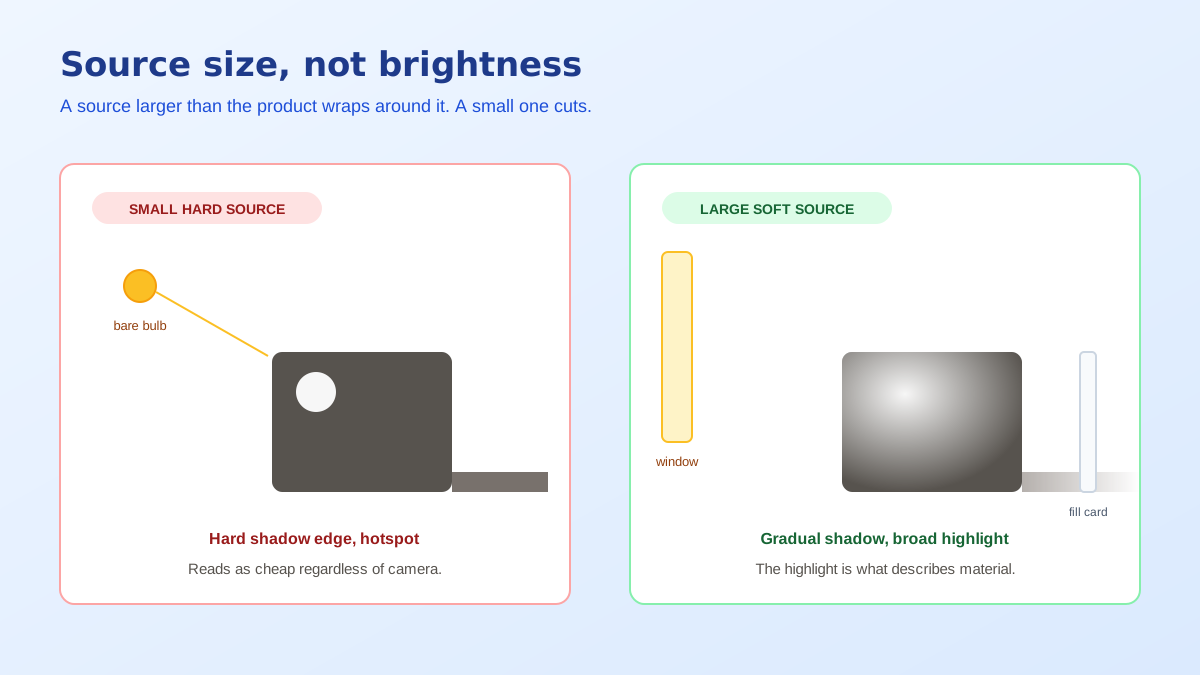
The single most important property of a light is not its brightness, it is its size relative to the product. A large source wraps around an object and produces a shadow with a soft gradual edge. A small source produces a hard-edged shadow and a harsh bright spot, which reads to the eye as cheap. A bare bulb, a phone torch and a camera flash are all small sources, which is why photos taken with them look the way they do regardless of how expensive the camera was.
The correction is to make the source physically bigger, and the cheapest way is proximity. A window one metre from the product is an enormous source. The same window across the room is a small one. If you are using a lamp, bounce it off a white wall or shoot it through a bedsheet, both of which convert a small hard source into a large soft one at no cost.
Light that travels along the same axis as the lens flattens everything. It removes the shadows that describe depth, so a textured leather bag reads as a flat brown shape and a machined metal edge disappears entirely. Buyers judge build quality almost entirely from how light moves across a surface, and axis lighting deletes exactly that information. Move the source to roughly 45 degrees off to one side and slightly above, and the same product suddenly has form.
Once the light is off to one side, the opposite side falls into shadow, and on a dark product that shadow can go completely black. A white card, a piece of foam board or even a sheet of A4 propped opposite the light bounces enough back to open that shadow up. This is the highest-value five rupees in product photography, and skipping it is why so many home-shot photos have one perfectly lit side and one that looks unfinished.
On a glossy product you cannot eliminate reflection, because a shiny surface has no appearance of its own. What you see in it is the room. The practical consequence is that you are not removing reflections, you are choosing what gets reflected. Make the source larger and move it further off axis and the hotspot becomes a broad soft highlight that describes the curve of the object. For very reflective items, build a rough white box around the product so it reflects an even white field rather than your kitchen.
White products on white backgrounds tempt people to underexpose, on the reasoning that they can brighten it later. This is backwards. Once a highlight is fully blown there is no data underneath to recover, and a white product that has been underexposed to protect it comes back grey and lifeless with visible noise in the shadows. Expose so the background clips and the product does not, then check the result on a properly calibrated screen rather than a phone at half brightness.
Every one of these corrections serves the same goal, which is to give a buyer enough surface information to judge the product without holding it. Shadow gradient describes shape. Highlight quality describes material, and it is the difference between reading a surface as brushed steel or as grey plastic. Colour accuracy describes what will arrive in the box. When lighting fails, one of those three signals goes missing, and the buyer resolves the uncertainty by not buying or by returning.
That is also why lighting has a better return than almost anything else you can spend money on. The photograph is doing the job that picking the product up would do in a shop, and it has one or two seconds to do it. Images move conversion more than copy does, and the product image conversion statistics put a number on how much of that decision they are really carrying.
Generation tools have changed which of these mistakes are expensive. A cluttered background, a dull room, a product sitting on a kitchen table instead of a styled surface: all of that is now trivially replaceable, and there is no longer any reason to spend a weekend building a set. Colour casts can be corrected. A weak shadow can be rebuilt more convincingly than most people can light one. Removing the background cleanly, which used to be the fiddliest part of the job, takes seconds with the free background remover tool.
What has not changed is that nothing recovers detail that was never recorded. A blown highlight contains no information, so there is nothing to restore. Motion blur cannot be unblurred into real detail. Focus on the wrong part of the object cannot be moved. These are the only lighting mistakes that are genuinely permanent, which is a useful thing to know because it tells you where to be careful and where to relax. Get exposure and focus right, and the rest is recoverable. That division of labour is the whole argument for AI product photography as a workflow rather than a gimmick.
Run that setup once and compare it against whatever you were doing before. The difference is usually larger than the difference between a phone and a professional camera, which is the point worth taking away: in product photo lighting, the equipment ranks well below the arrangement. Shooting large also protects you further down the pipeline, where storefronts generate their own smaller copies and stretch them when the source was too tight, a trap the WooCommerce product image size guide walks through. Once the source photo is clean, the same image can be restaged into as many contexts as your listing needs, and the specifications for each marketplace differ. Amazon draws those lines in particular places, which the Amazon image requirements guide spells out field by field.
Because your camera is doing exactly what it was designed to do. Light meters assume an average scene reflects about 18 percent of the light hitting it, so when the frame is mostly white the meter reads it as too bright and darkens the exposure until the white sits at middle grey. The fix is exposure compensation of roughly plus one to plus two stops, not a brighter light or a whiter backdrop.
One large soft source at roughly 45 degrees to the product, a white card opposite it to fill the shadow side, and every other light in the room switched off. Large and close is the whole trick, because a source that is physically bigger than the product wraps around it and produces gradual shadow edges. A window on an overcast day beats most cheap lighting kits.
Almost always mixed colour temperature. Daylight from a window is around 5500K and a warm ceiling bulb is around 2700K, and when both land on the product your camera can only correct for one. The result is a colour cast that shifts across the object, which is the single most common cause of returns for wrong colour. Turn off every light except one type.
You cannot remove reflections from a glossy surface, you can only choose what it reflects. Make the light source larger and move it further off axis so the reflection becomes a soft broad highlight rather than a hard bright spot. For very reflective items, surround the product with white card so it reflects an even white field instead of your room.
It can relight, restage and replace the background convincingly, and it can correct a colour cast. What it cannot do is recover information that was never captured. Blown highlights on a white product, motion blur, and focus on the wrong part of the object are permanent, because there is no detail underneath to restore. Expose correctly and almost anything else is fixable later.
Considerably more. A current phone camera in good soft light produces a better listing image than a professional body in bad light, because sensor quality affects noise and detail while lighting affects shape, colour and material readability. Every buyer judgement about whether a product looks well made comes from how light describes its surface.
ListingRVA AI now works inside Claude. Connect your workspace and ask Claude to generate listing copy and publish product images to your store, without leaving your editor. See the Claude connector →
Comments
No comments yet, be the first.
Leave a comment