
Handbag Product Photography: Capacity, Strap Drop and Shape
August 10, 2026 · 8 min read · by Aashirvad Kumar
Your credits refresh every month for as long as ListingRVA AI exists. No renewals, no annual increases, nothing to cancel.
Available on select plans. No renewals, ever.
August 10, 2026 · 8 min read · by Aashirvad Kumar
Scroll the questions on any bag listing and two of them come up again and again. Will a laptop fit. Can I wear it across the body or does it only go on the shoulder. Occasionally someone asks about the leather, but the volume is always on capacity and on how the thing hangs, and both questions exist because the photographs did not answer them.
That is the specific weakness of handbag product photography as most sellers practise it. Eight images of a closed bag rotating through eight angles look thorough and answer nothing, because a bag is a container that is worn, and neither the container part nor the worn part is visible when it is sitting shut on a white sweep.

A closed bag is an opaque shape. Every angle of it describes the same exterior, so the second, third and fourth frames add almost no information beyond the first. Meanwhile the two attributes that decide the purchase, internal volume and how the bag sits on a body, are structurally invisible from outside. Rotating the object more times cannot fix a problem caused by the object being closed.
The specification table does not rescue it either. Litres mean nothing to most buyers, and a set of external dimensions in centimetres tells you the size of the box the bag would ship in, not whether a fifteen inch laptop clears the opening. When a buyer cannot resolve a question from the images, they either ask it publicly and wait, or they leave, and most of them leave.
The reliable technique is to fill the bag with objects whose size is already known to everybody, then shoot from directly above with the bag open and the interior fully lit. A phone, a small purse, sunglasses, a folded scarf, a water bottle, a tablet or laptop where one fits: these read instantly and need no caption. Nobody knows what nine litres looks like, and everybody knows what a water bottle looks like.
Shoot a companion frame that lays the same objects out flat beside the empty bag. This converts an impression into a claim the buyer can check, and it also protects you, because a top-down shot into a bag can flatter the depth. Two frames of the same set of objects, one inside and one alongside, is the cheapest trust available in handbag product photography.
Lighting the inside is the part people get wrong. The interior is a cavity, so a single overhead source drops it into darkness and the lining disappears, which matters because the lining and the pockets are what buyers judge the build by. Bounce a card into the opening or place a small second source low and off to one side, enough to open the shadow without flattening the exterior.
Then map the pockets. One frame with the bag open and the interior pockets held visible, ideally with a small item tucked into each, tells a buyer where their keys and their phone will live. Zip compartment, slip pockets, key leash: all of it is normal in the specification and invisible in the photographs, and this single frame removes a whole category of pre-purchase questions.
Strap drop is the vertical distance from the top of the strap to the top of the bag, and it is the number that decides whether a bag clears a shoulder, sits at the waist or hangs at the hip. It is not the same as strap length, and quoting length alone is why buyers keep asking. Photograph it directly: strap extended in a flat lay, the measurement marked from the top of the loop down to the top of the bag.
The flat lay is only half of it. Where the bag actually lands on a body depends on the drop and on the wearer, so the second frame has to be on a person, at a consistent height, with the strap at a stated setting. If the strap adjusts, show the two extremes rather than a middle position nobody can locate. For a convertible bag, show each configuration as its own frame instead of describing them in a bullet.
This is also where scale is settled. On a results page a compact crossbody and an oversized tote occupy identical pixel dimensions, and only a body reference separates them. It is the same failure that affects shoes photographed alone on white, which the footwear product photography guide covers, and the cure in both categories is a human in at least one frame.
A structured bag has to be lightly filled or it collapses and photographs as something cheaper than it is. Tissue, a foam insert or a cut piece of board along the base is standard practice and it is honest, because it shows the shape the bag is designed to hold. The line is crossed when a soft, unlined bag is packed rigid so it looks architectural, since the buyer then receives an object that will never take that shape.
The safest test is simple. Photograph the shape the bag will have on the day it is unboxed and lightly loaded, not the shape it can be forced into for one frame. Sellers who ignore this generate returns for a reason that never appears in the return note, and the pattern is easy to spot: strong click rate, weak review sentiment on the phrase describing shape.
Four close-ups earn their slot. The material surface under a raking side light, which is what separates full grain leather from a coated finish or a printed texture. The stitch line where the strap meets the body, which is the join that fails first. The edge finish, painted or bound or raw. And the hardware, meaning the zip pull, the clasp and the feet on the base if there are any.
Light these from the side, never from the camera position, because surface relief only exists when a shadow describes it. Frontal light turns pebbled leather into flat brown and makes brushed hardware look like grey plastic, which is the most expensive avoidable error in handbag product photography. Getting a clean, evenly lit product on a neutral field first makes every later variation easier, and cutting the item out cleanly with the free background remover tool keeps the detail frames consistent with the main image.
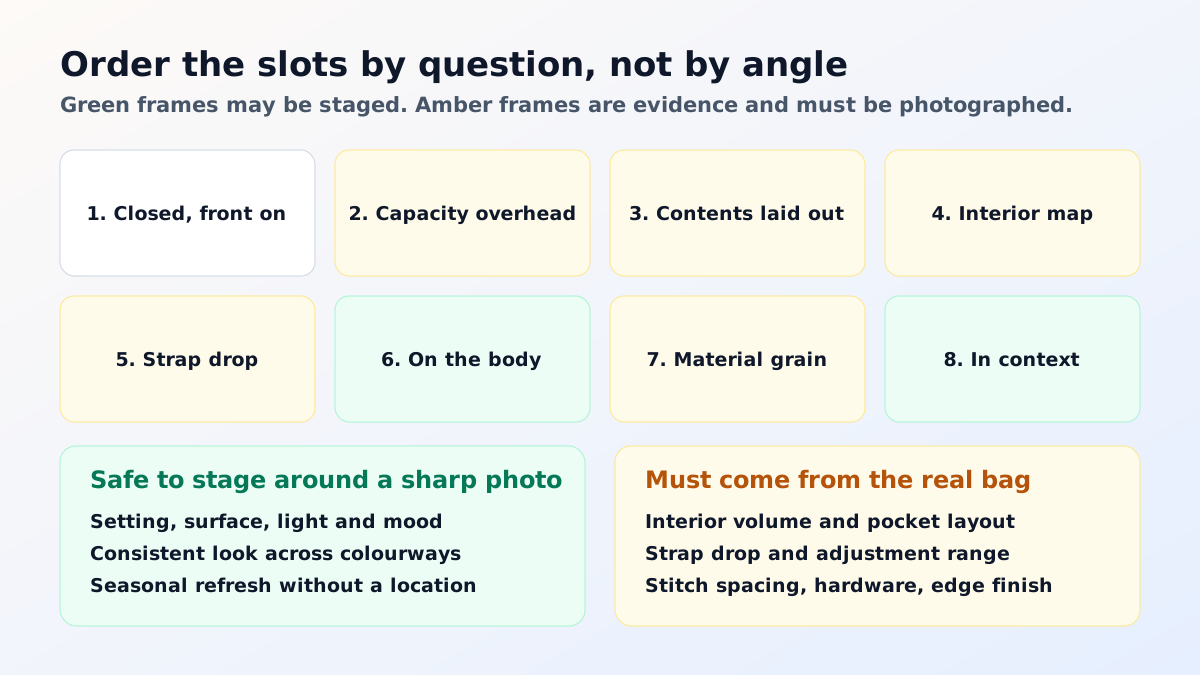
That sequence is deliberately ordered by the question it answers rather than by the angle it shows. Marketplaces constrain the first slot much more tightly than the rest, and the exact rules on background, framing and overlaid graphics are set out in the Amazon image requirements guide. Everything after the main image is where the actual selling happens.
Context is staging work and it is now cheap to produce. A bag photographed cleanly on a neutral field can be placed on a cafe table, a hotel bed, a wooden bench in daylight, with correct shadows and a consistent look across a whole range, which is far more practical than booking a location for every colourway. That kind of restaging is the everyday case for AI product photography in fashion accessories, where colour variants multiply fast.
Capacity, strap drop and material texture are the opposite. They are facts about your specific bag, so they have to be measured and captured rather than implied, and a generated frame that changes hardware shape or stitch spacing will be caught by exactly the buyers who care most. Keep the staged frames for mood and keep the evidence frames real. Handmade and small-batch sellers in particular get held to that standard, and the Etsy product photography tips go further into it. Done that way, handbag product photography stops being eight views of a closed object and starts being a set of answers.
Fill it with objects whose size everyone already knows and photograph it from above with the bag open. A phone, a purse, sunglasses, a water bottle and a laptop or tablet where it fits are all understood without a caption. A second frame laying those same items out beside the empty bag makes the claim checkable rather than decorative.
Strap drop is the vertical distance from the top of the strap to the top of the bag, which is what decides whether it clears a shoulder or a coat. Photograph it two ways: a flat lay with the strap extended and the measurement marked, and an on-body frame showing where the bag actually sits. For an adjustable strap, show the shortest and the longest setting.
Stuff a structured bag lightly so it holds its intended shape, because an unstuffed structured bag collapses and looks cheap. Do not stuff a slouchy bag into a shape it will never hold, since that is the most common cause of disappointment on arrival. The safe rule is to show the shape the buyer will get on the day it is unboxed.
Four earn their place: the grain and finish of the material at raking light, the stitch line where the strap meets the body, the edge paint or bound edge, and the hardware including the zip pull and the feet. These are the details buyers use to judge whether a bag is worth its price, and they are the frames most listings leave out.
You need a body reference, and a model is the most convincing one. Without it, buyers cannot resolve scale, because a small crossbody and a large tote photographed alone on white occupy the same space in the search results. If a shoot is not possible, an on-body frame generated around your real product photograph still answers the scale question.
Yes for the setting, the surface, the lighting and the styling around a sharp original. Be careful with anything that changes the product itself, since hardware shape, stitch spacing and logo placement are exactly what buyers zoom into. Keep the generated frames for context and keep at least one unretouched photograph of the real bag in the set.
ListingRVA AI now works inside Claude. Connect your workspace and ask Claude to generate listing copy and publish product images to your store, without leaving your editor. See the Claude connector →
Comments
No comments yet, be the first.
Leave a comment