
Toy Product Photography: How to Show Age Fit and Real Scale
July 27, 2026 · 8 min read · by Aashirvad Kumar
Your credits refresh every month for as long as ListingRVA AI exists. No renewals, no annual increases, nothing to cancel.
Available on select plans. No renewals, ever.
July 27, 2026 · 8 min read · by Aashirvad Kumar
A parent lands on your listing, looks at a bright, sharp, perfectly lit photograph of a wooden stacking toy on white, and cannot answer either of the two questions that decide the purchase: is this the right size, and is it right for my child's age. Good toy product photography is not a lighting problem for most sellers. It is an information problem, and a photograph of the toy alone contains almost none of the information the buyer needs.
The gap is structural. Every marketplace scales your images into the same square, so a five centimetre finger puppet and a sixty centimetre plush occupy identical space on the screen. And a toy has no natural age signal at all: the same set of coloured blocks could plausibly be sold for eighteen months or for eight years. Those two ambiguities produce the same outcome, which is a message asking for clarification, or a return.

Size perception in a photograph works by comparison, not by measurement. The eye estimates how large something is by reading it against objects whose size it already knows: a hand, a chair, a doorway, a mug. Strip those out and the object floats, and the brain defaults to the size of the thing on screen. That default is why buyers consistently guess wrong in both directions, ordering a ride-on car expecting a shelf model and ordering a keychain expecting a toy.
Dimensions in the bullet points do not close the gap, because reading "24 x 18 x 30 cm" and picturing an object are separate mental operations and most shoppers skip the second. A dimension line is a verification tool for someone who already has a picture in their head. The picture has to come from the image, which means at least one gallery slot has to carry a reference object, and it has to be an object the buyer owns.
Toys carry an age grading for safety reasons, not marketing reasons. In the United States the small parts rule tests components against a standard cylinder and triggers a choking hazard warning for products intended for children under three, and toy safety is governed by ASTM F963, with EN 71 covering the equivalent ground in Europe. That grading is printed on your packaging and entered in your listing attributes already. The image should repeat it, not reinvent it.
The practical form is a small, legible badge on one secondary image reading the same age band as the box. It sounds trivial and it removes a whole category of pre-purchase question. Where sellers get into trouble is inventing a friendlier range for the photo because the real one narrows the audience, which produces a listing whose picture, artwork and attributes disagree with each other.
A photograph of a child using the product is the most efficient age cue that exists, because the viewer reads developmental stage instantly and without effort. It also has to be honest. A four-year-old shown with a toy graded three and up is fine. A seven-year-old shown with the same toy quietly reframes it as a bigger-kid product and invites disappointment when it arrives. Cast the scene to the middle of the band, not the top of it.
There is a second, quieter age signal that costs nothing: the environment. A toddler product photographed on a low soft mat with rounded furniture reads as a toddler product before anyone has read a word. The same toy photographed on a desk beside a laptop reads as a collector item. Buyers absorb that context faster than they absorb text, so choose the room, the floor height and the props to match the age you are selling to.
Remember that the main image cannot do this work. Amazon requires the primary image to be the product alone on a pure white background with no props, models, text or logos, and the product should fill about 85 percent of the frame. Every age and scale cue therefore belongs in slots two onward, which is the part sellers underuse. The rules for what may appear where are set out in the Amazon image requirements guide.
For anything that fits in two hands, a hand is the best scale reference available. It costs nothing, it is universally understood, and unlike a coin or a ruler it does not make the shot look like evidence in a court case. Photograph the toy being held the way it is actually held, with the hand in focus and the grip natural, and the size question answers itself in under a second with no text at all.
For larger items the reference has to scale up with the product. A play kitchen next to a normal kitchen chair, a ride-on beside a doorway, a tent pitched in a recognisable living room. The reference does not need to be measured or labelled, it needs to be ordinary. Anything unusual becomes a distraction and the viewer starts reading the prop instead of the product. This is the same logic behind large-item staging described in the furniture product photography guide.
One image in the set should be a clean dimension callout: the toy on a plain background with measured lines and figures in both centimetres and inches, and where relevant an assembled versus packed size. Multi-part sets should state the piece count here as well, because "36 pieces" in a photo is read and remembered while the same number in a bullet is skimmed. Keep the type large enough to survive the thumbnail.
Toy product photography works best when the gallery follows the order buyers actually think in. Toy shoppers move through a predictable sequence: what is it, how big is it, who is it for, what is in the box, and does it look worth the money. A gallery that follows that order does the selling. A gallery that opens with three near-identical white-background angles wastes the slots where attention is highest, and by the time the useful image arrives the buyer has already left for a competitor with a clearer set.
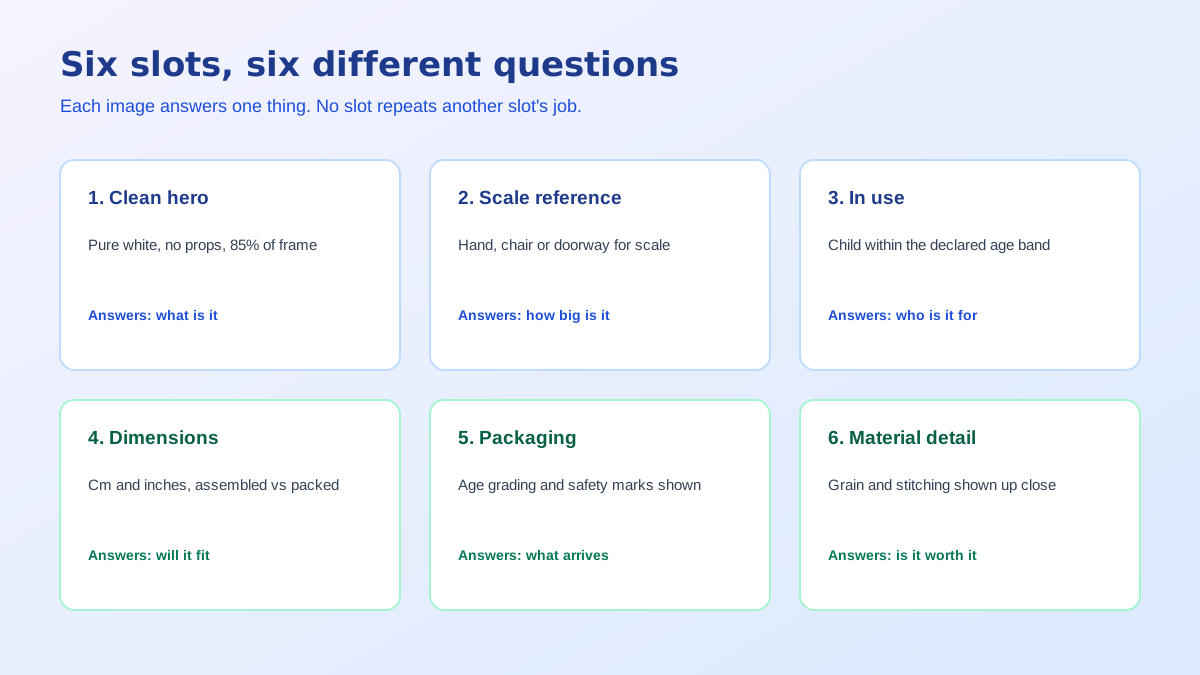
A workable order is the clean hero, a scale shot with a hand or a room, an in-use shot with a child in the right age band, a dimension and piece-count slide, a packaging shot, and a detail shot of material or finish. Six slots, no repetition, each answering exactly one question. Images carry more of the decision than copy does on this kind of product, and the product image conversion statistics give a sense of how much.
The expensive part of toy product photography has never been the white-background shot. It is the staged scenes: a playroom, a birthday table, a garden, a bedroom floor with reasonable props and light. Those are exactly the frames that image generation now handles from a single clean source photograph, which is why a small brand can ship a six-image gallery without booking a studio or a location. That workflow argument is the whole case for AI product photography in this category.
The limits matter more here than in most categories. A generated scene must not invent parts that are not in the box, must not imply a piece count, and must not render a scale relationship that contradicts your measured dimensions, because a toy that looks knee-height in a lifestyle frame and arrives palm-sized is a guaranteed return. Generate the environment, keep the product geometry, then check every implied size against the spec sheet before it goes live.
Run an audit of your current toy product photography against those seven lines and the missing slot is usually the same one: nothing in the entire gallery tells the buyer how big the thing is. Fixing that single omission is normally worth more than reshooting anything you already have. If you are building the comparison and size slides as graphics rather than photographs, the free comparison chart generator produces the layout without design work.
Because a toy photographed alone on white has no size at all. Every listing image is scaled to the same slot, so a keyring dinosaur and a metre-tall ride-on occupy identical space on screen. Dimensions in the bullets do not fix it, because almost nobody converts centimetres into a mental picture. Only a second object of known size in the frame does that.
Yes on most marketplaces in secondary images, and it is the strongest age cue available, but the main image on Amazon must be the product alone on pure white with no props or models. Keep the child clearly inside the age band you are claiming, because a listing that shows a seven-year-old with a toy graded for three and up sets the wrong expectation.
Put the age band you already declare in your listing attributes as a plain text badge on one secondary image, and support it with a scene that matches. Do not invent a range for the picture. The age grading on the artwork, in the listing attribute and in the image has to be the same number, or you are creating a mismatch a reviewer or a returning customer will find.
A hand is the most reliable one, because every buyer knows the size of their own hand and it works for anything from a die-cast car to a board game box. For larger items use a piece of furniture the toy sits beside. Coins and rulers are precise but they read as a laboratory shot rather than a product shot, so keep them to the dimension slide.
For toys, yes. The box carries the age grading, the safety marks and the piece count, and it is also what a gift buyer imagines handing over. A packaging shot answers the gifting question and the compliance question in one slot, and it reduces the messages asking whether the item arrives boxed or loose in a poly bag.
It can restage a real product photo into a playroom, a garden or a party table without a shoot, which is where most of the cost sits. What it must not do is invent features, invent a piece count, or render a scale relationship that does not match your measured dimensions. Generate the scene, then check every implied size against the spec sheet.
ListingRVA AI now works inside Claude. Connect your workspace and ask Claude to generate listing copy and publish product images to your store, without leaving your editor. See the Claude connector →
Comments
No comments yet, be the first.
Leave a comment