
AI Image Artifacts: The Checklist to Run Before You Publish
August 7, 2026 · 8 min read · by Aashirvad Kumar
Your credits refresh every month for as long as ListingRVA AI exists. No renewals, no annual increases, nothing to cancel.
Available on select plans. No renewals, ever.
August 7, 2026 · 8 min read · by Aashirvad Kumar
The image looked perfect in the thumbnail. It went live, and three days later a customer message arrives asking why the bottle in your photo has a pump the actual product does not have. Or a return comes back marked not as described because the strap in image four is stitched on the wrong side. AI image artifacts almost never announce themselves at the size you review images at, and they are always obvious at the size a buyer zooms to.
This is an inspection routine rather than an argument about whether to use generated imagery. If you are shipping AI frames to a live catalogue, these are the defects that actually occur, in the order it is most efficient to look for them.
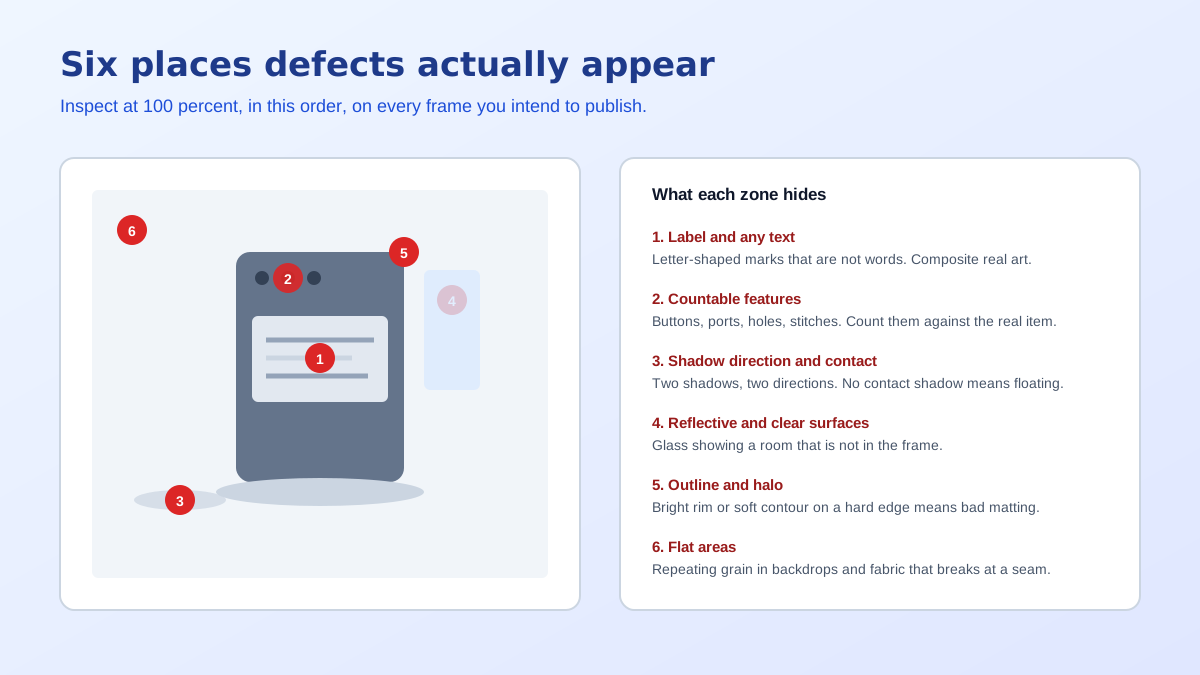
Two things conspire against you. The first is viewing size: most people approve images fitted to a laptop screen, which is perhaps 900 pixels tall, while the file itself is 2000 or more and the marketplace zoom viewer shows it near full size. Every defect listed below lives in the gap between those two. The second is that generated frames are internally consistent in style, so nothing looks wrong in the way a badly lit photo looks wrong. The lighting is plausible, the composition is clean, and the error is a local detail your eye skips because the whole is convincing.
That is also why a spot check fails. Each frame in a batch is produced independently, so cleanliness does not carry over from one to the next. A run of eight images can have seven flawless frames and one with a duplicated buckle, and the only way to find it is to look at all eight at full size. Treat AI image artifacts as a per-file property, never a per-batch one.
Image models render letterforms as texture, not as characters, so they produce marks with the rhythm of writing and none of the content. On a listing image the label is the single worst place for this to happen, because it is exactly where a shopper zooms to verify what they are buying. Ingredient panels, size markings, wattage, weight and brand wordmarks are all in this category. The reliable answer is not to generate them at all: keep the real label artwork as a separate layer and composite it onto the generated frame, so the words are the words your packaging actually carries.
Count everything a buyer could count. Buttons on a shirt, holes in a shoe upper, hinges on a lid, wheels on a case, ports along an edge, stitches at a seam junction, prongs on a plug. Generation is statistical, so it produces a plausible number rather than the correct one, and a five-hole belt that arrives with seven is a return. This check catches the artifacts with the largest commercial cost, because an invented or missing feature is a product accuracy problem rather than an aesthetic one.
Find the brightest highlight on the product, decide where the light must be, then check every shadow in the frame agrees with it. Generated scenes routinely place a soft shadow to the left of one object and to the right of the one beside it, and once you see it you cannot stop seeing it. Then check the contact point: a product with no shadow where it meets the surface reads as floating and is the most common giveaway that an image was assembled rather than photographed.
Chrome, glass, glaze, screens and polished wood all show you the room. In a generated frame they often show a room that is not the one in the picture: a window where there is no window, a figure that is not present, a different colour of surface underneath. Transparent objects are worse, because refraction is a physical relationship the model approximates, so the part of the background seen through a bottle frequently fails to line up with the background beside it.
Zoom to the outline of the product against the background and follow it all the way round. A faint bright rim, a slightly blurred contour on a hard-edged object, or a patch where the background bleeds into the product all indicate a matting failure somewhere in the pipeline. This is also where a badly cut source image reveals itself, and it is worth fixing at the source with a clean cutout from a proper product image background remover rather than repairing it afterwards.
Look at large uniform regions: the backdrop, a plain wall, a tabletop. Generation tends to leave faint tiling in them, a repeating grain or a soft blotch that is invisible on a phone and visible on a 27 inch monitor. Fabric is the usual victim, because a woven pattern that does not continue correctly across a seam or a fold is immediately readable as wrong to anyone who works with textiles.
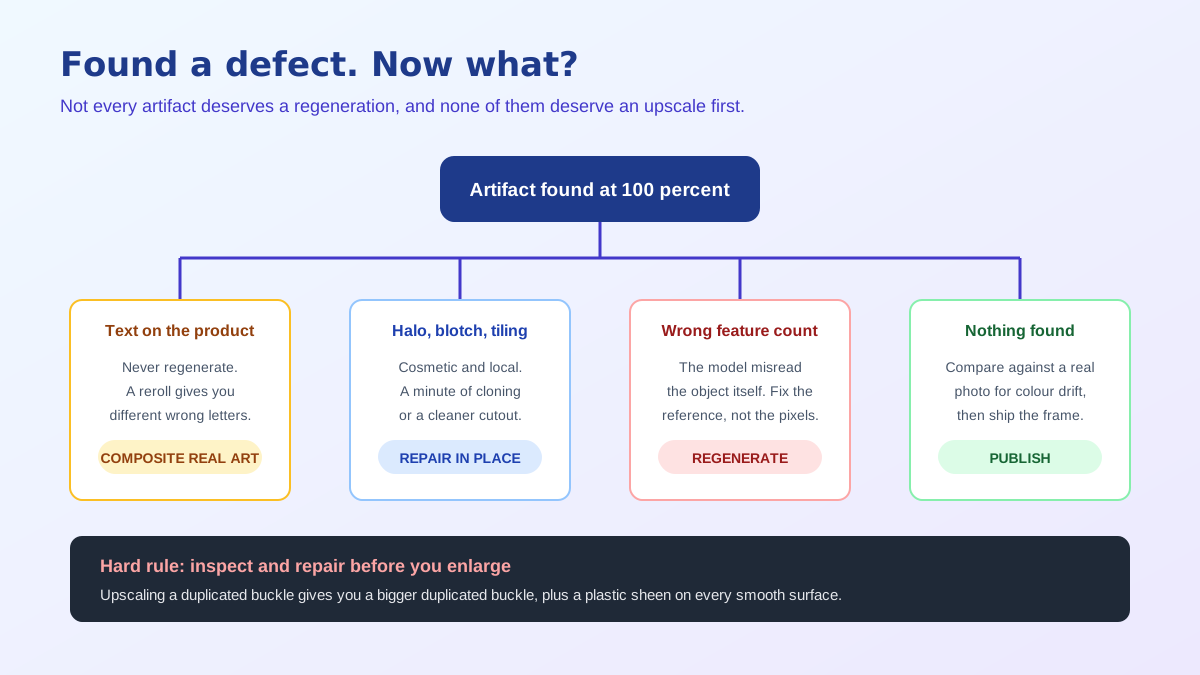
Not every artifact deserves the same response, and treating them uniformly is how people burn a whole afternoon regenerating. Text defects are a compositing job, never a regeneration job, because rerolling the frame gives you different wrong letters at similar cost. Halos, small blotches and background tiling are local repairs that take a minute in any editor. Countable feature errors and structural impossibilities are the ones worth regenerating, because they mean the model misunderstood the object rather than rendering it imperfectly.
One rule overrides the rest: never upscale before you have inspected. Enlarging an image with a duplicated buckle gives you a larger duplicated buckle, and upscalers add a signature of their own, typically an over-sharpened plastic sheen on smooth surfaces and crunchy micro-contrast along every edge. Inspect at native size, repair, then enlarge if you still need to. The comparison in the AI versus traditional photography breakdown is useful here, because it clarifies which frames are worth photographing conventionally in the first place.
There is a difference between an artifact that looks bad and one that misrepresents. A tiling pattern in a backdrop is embarrassing. An extra port, a longer cable, a closure that does not exist on the shipped item, or a colour that is two shades off is a listing accuracy issue, and marketplaces evaluate images against what the buyer receives regardless of how the picture was made. Those are the ones that end in suppressed images and returns marked not as described, so they belong at the top of the checklist rather than the bottom, and running an Amazon listing quality checker before publishing catches related problems in the same pass.
Disclosure is a separate obligation from accuracy and worth keeping separate in your head. Several platforms now expect generated or heavily edited imagery to be labelled, and the requirements differ by marketplace and are still moving, so the rule of thumb is to check the current policy for each channel you list on rather than assume they match. The Amazon product image requirements cover the mechanical side, and the disclosure side sits alongside it.
None of this is an argument against generated imagery. The economics are decisive, and a careful pipeline produces frames that are indistinguishable from a studio set at a fraction of the schedule. It is an argument for treating the output as raw material that needs a quality gate, exactly as a photographer culls a shoot. Used that way, AI product photography is a production tool, and the checklist is what keeps AI image artifacts out of the frames your customers actually see.
They are defects introduced by the generation process rather than by the camera: text that dissolves into letter-shaped marks, hardware that duplicates or vanishes, shadows that point in a different direction from the light, reflections that show something not present in the scene, and edges that carry a faint halo. None of them are focus or exposure problems, so none of them are fixed by regenerating at a higher resolution.
View it at 100 percent rather than fitted to the screen, and inspect in a fixed order: label and any text first, then countable features such as buttons and stitches, then shadow direction against the visible light, then reflective surfaces, then the outline of the product for halos. Finish by comparing it side by side with a real photo of the same item.
Image models generate letterforms as visual texture rather than as characters, so they produce marks that have the rhythm of writing without the content of it. On a product image this is the most damaging artifact available, because the label is exactly where a buyer zooms in to verify what they are buying. Real label artwork should be composited in rather than generated.
Yes, and it is the risk most sellers underestimate. Marketplaces judge images against product accuracy rules, so an invented port, an extra strap or a different closure makes the listing inaccurate regardless of how the image was produced. It also generates returns marked as not as described, which damages account health well beyond that one listing.
No. Upscaling enlarges what is already there, so a duplicated buckle becomes a larger duplicated buckle and smeared label text becomes larger smeared text. Upscalers also add their own signature, usually an over-sharpened plastic look on smooth surfaces and a faint repeating pattern in flat areas. Fix defects before enlarging, never after.
Every one you intend to publish. Artifacts are not consistent within a batch, because each frame is generated independently, so a clean first image tells you nothing about the ninth. A full-size inspection takes under a minute per frame once the order of checks is habitual, which is far cheaper than a suppressed listing.
ListingRVA AI now works inside Claude. Connect your workspace and ask Claude to generate listing copy and publish product images to your store, without leaving your editor. See the Claude connector →
Comments
No comments yet, be the first.
Leave a comment